
We know the feeling. It’s a cold winter morning, you’re warm and cosy in bed and you can’t stand the thought of stepping out from underneath the covers. Or maybe you’re at work on a scorching summers day and want to ensure you come home to a nice cool home. Whatever the situation, your heat pump’s timer functions can help!
Mitsubishi Heavy Industries’ range of split system, ducted system and ceiling system heat pumps have several convenient timer and scheduling functions that can accommodate your individual needs. These can help ensure your home is the perfect temperature all year round and can also help save on running costs. We go through them below including step by step instructions.
This timer allows you to set your heat pump to turn on at specific time within a 24-hour period. Use this timer to set your heat pump to turn on in the afternoon to ensure you arrive home to a nice and comfortable house.
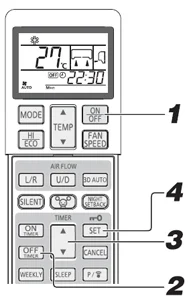
1. Press the ON TIMER button on the bottom of the remote control.
2. Using the UP or DOWN arrow keys on the TIMER button, set the time you would like your heat pump to turn on.
3. Press the SET button.
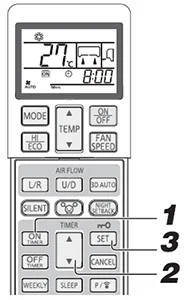
The display on the wireless remote will stop flashing and the yellow timer light on the indoor unit will remain on when the timer has been successfully set.
For more information on setting the timers on your split system, refer to your user manual which you can find in here.
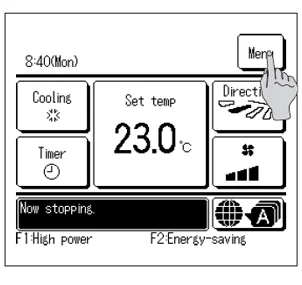
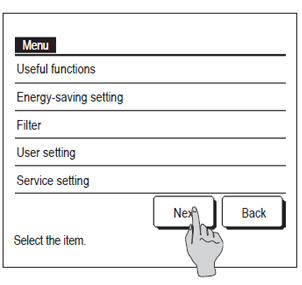
1. Using the touch screen, select the MENU button on the top right of the screen.
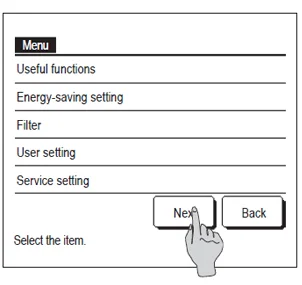
2. Select USEFUL FUNCTIONS.
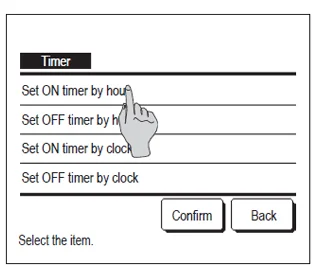
3. Select TIMER.
4. Select SET ON TIMER BY HOUR or SET ON TIMER BY CLOCK.
5. Use the UP and DOWN arrow keys to set the number of hour delay or the time you’d like the system to turn ON.
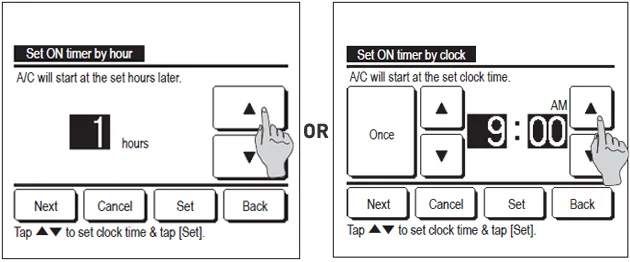
6. Set the OPERATION MODE, SET TEMPERATURE, FAN SPEED and ZONES.

7. Once done, press SET.
For more information on setting the timers on your wired controller, refer to the RC-EXZ3A user manual which you can download here.
Designed to be set when the heat pump is running, this timer allows you to set your heat pump to turn off at specific time within a 24-hour period.
1. If the unit is not already on, press the ON/OFF button to turn the unit on.
2. Press the OFF TIMER button on the bottom of the remote control.
3. Using the UP or DOWN arrow keys on the TIMER button, set the time you would like your air conditioner to turn OFF.
4. Press the SET button.
The display on the wireless remote will stop flashing and the yellow timer light on the indoor unit will remain on when the timer has been successfully set. For more information on setting the timers on your split system, refer to your user manual which you can find here.
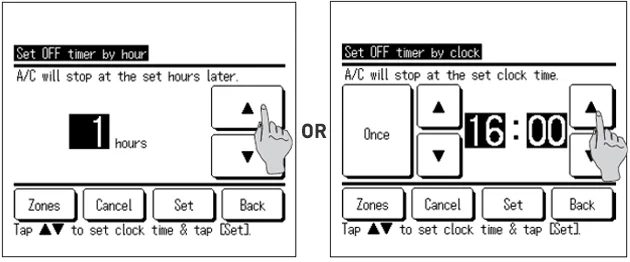
1. Using the touch screen, select the MENU button on the top right of the screen.
2. Select USEFUL FUNCTIONS.
3. Select TIMER.
4. Select SET OFF TIMER BY HOUR or SET OFF TIMER BY CLOCK.
5. Use the UP and DOWN arrow keys to set the number of hour delay or the time you’d like the system to turn OFF.
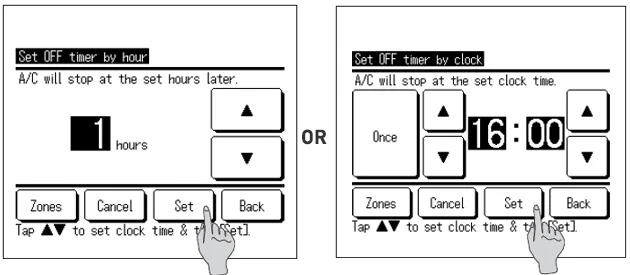
6. Select which ZONES you’d like to turn off (if applicable) before pressing SET to return to the timer screen.

7. Press SET to finalise the timer.
For more information on setting the timers on your wired controller, refer to the RC-EXZ3A user manual which you can download here.
This timer allows you to set a pre-determined amount of time between 30 and 240 minutes for your unit to operate before switching off. Perfect for ensuring your air conditioner turns off after you’ve fallen asleep, which also helps keep running costs down!
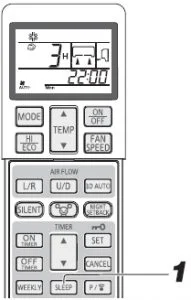
1. Press the SLEEP button on the bottom of the remote control.
2. Continue to press the SLEEP button until it shows the correct amount of time you’d like the unit to run before turning on.
Example: if you would like the unit to turn off after 3 hours, press the button until ‘3H’ is displayed.
The yellow timer light on the indoor unit will remain on when the timer has been successfully set. For more information on setting the timers on your split system, refer to your user manual which you can find here.
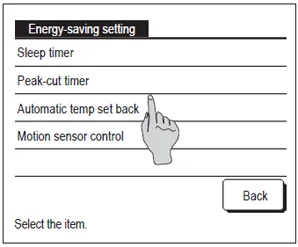
1. Using the touch screen, press MENU on the top right of the screen.
2. Select ENERGY SAVING SETTING.
3. Select SLEEP TIMER.
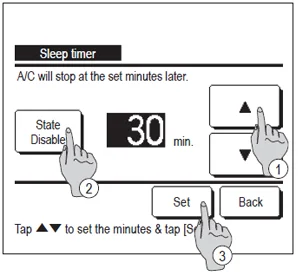
4. Using the UP and DOWN arrow keys, select how many minutes you would like the air conditioner to run before turning off.
5. Select the STATE button to ENABLE the timer.
6. Press SET to active the timer.
This allows you to set up to 4 timer operations a day (with a maximum of 28 per week). Once set, the unit will turn on and off at the specified times of the day, repeatedly. This timer is helpful in setting your air conditioner to turn on before you wake up in winter – ensuring you wake up to a nice warm house! Alternatively, it’s also helpful to ensure you come home to a cool living room during summer.
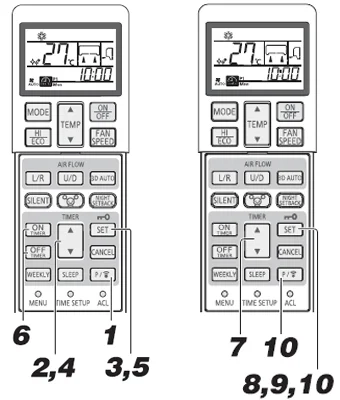
1. Press the PROGRAM button on the remote control.
2. Using the UP or DOWN arrow keys on the TIMER button, select the different day you would like to set a timer for.
3. Press the SET button.
4. Using the UP or DOWN arrow keys on the TIMER button, select the different program number for each day. These are numbered P1 – P4. Each program represents a timer set to turn the unit ON or OFF.
5. Once you have selected a program, press the SET button.
6. Press the ON TIMER or OFF TIMER button to determine whether this program will turn the unit ON or OFF.
7. Using the UP or DOWN arrow keys on the TIMER button, select the time you’d like the unit to turn ON or OFF on each particular day.
8. Set the operation mode and fan speed.
9. Press the SET button.
10. Press the PROGRAM button to finalise.
The weekly icon and program icon will blink on the screen if the timer has been set successfully. For more information on setting the timers on your split system, refer to your user manual which you can find here.
1. Using the touch screen, select MENU on the top right of the screen.

2. Select USEFUL FUNCTIONS.
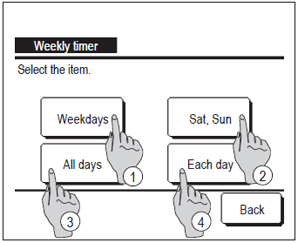
3. Select WEEKLY TIMER.
4. If the unit asks for an administration password, enter this. If no password has been set, enter ‘0000’
5. Select the different days you’d like to apply timers to by pressing WEEKDAYS, SAT, SUN, ALL DAYS or EACH DAY.
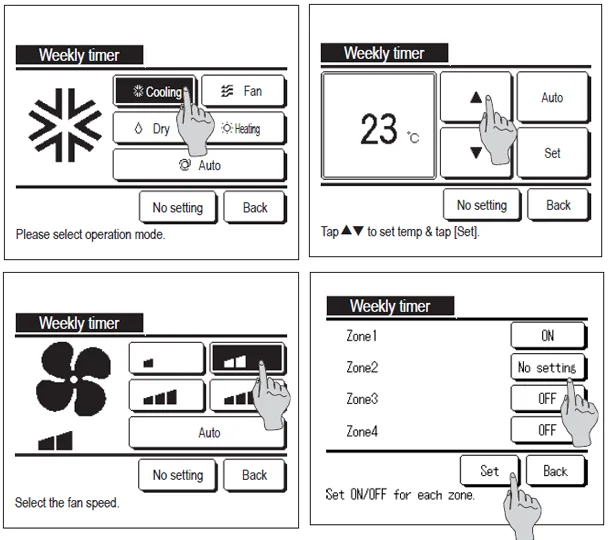
6. If selecting WEEKDAYS, SAT, SUN or ALL DAYS, select the different times you’d like the system to turn ON or OFF and the applicable OPERATION MODE, FAN SPEED, TEMPERATURE and ZONES (if applicable).
7. Press SET button.
7. If selecting EACH DAY, select the applicable day you would like to set a timer for.
8. Select ONE of the FOUR timers and press CHANGE to edit this timer.
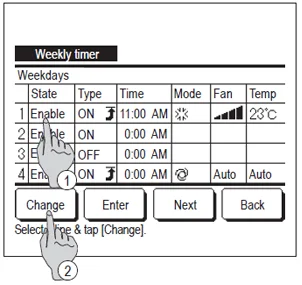
9. Once you have selected a timer press the ENABLE button, choose whether this timer will be an ON or OFF timer and then select the TIME at which the unit will turn ON or OFF.
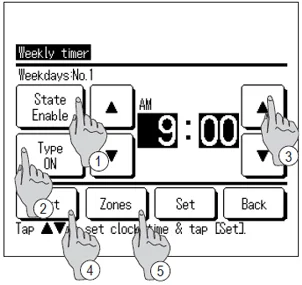
10. If setting an ON timer, choose the applicable OPERATION MODE, FAN SPEED, TEMPERATURE and ZONES (if applicable) before pressing SET.
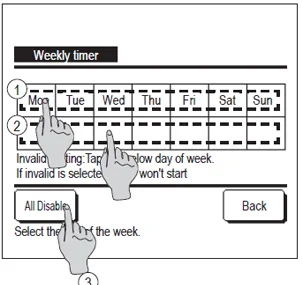
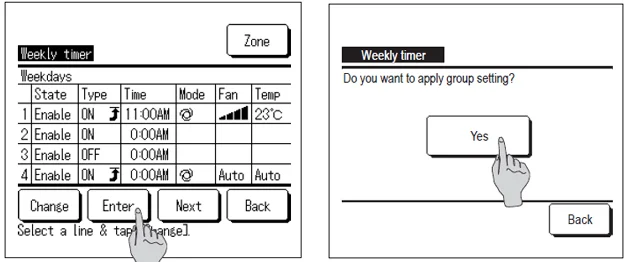
12. Once complete, press ENTER, followed by the YES button to enable all timers.
For more information on setting the timers on your wired controller, refer to the RC-EXZ3A user manual which you can download here.
For additional timer and scheduling functions, refer to your user manual which you will be able to find in our online Knowledge Centre. If you’d like some help with using your own timer functions on your MHIAA system, you can contact us on 1300 138 007 or submit an online query via our contact us page.
If you’re considering replacing our upgrading your heat pump with a Mitsubishi Heavy Industries system, leave some details in the form below and we’ll get an authorised installer to get in touch to provide a quote!
* The wireless remote control and instructions shown is for the Avanti® series and Bronte® series split system. The same functions can also be used on the Avanti PLUS series® of split systems.
**If your split system remote control or ducted system wired remote differs from the ones shown, we suggest referring to your unit’s user manual which you can find on our user manuals page.
***All timer functions can only be enabled with the RC-EXZ3A or RC-EX3A wired controller.
****Slight variations on these steps may occur depending on the timer you wish to set. For full instructions on how to set each function timer, please refer to your controller’s user manual which can found on our user manuals page.